

For Nail Design 19, I was inspired by vintage Polka Dot patterns on fabric.
 images from pixelscrapper.com and onthedotcreations.com
Though I don't recall seeing black polka dots on a pink background before, I thought the two colors contrasted nicely, so that the dark black polka dots stand out strongly against the soft pink hue.

The two polishes used were Bubblegum Pink from Sally Hansen and Black Out from Sally Hansen.
These were the dotting tools I used:

All of the polka dots were put on using the same dotting tool end so they would be roughly the same size to achieve a more even pattern.


Step 1, following base coat, paint on two coats of the base color and let dry. (Remember, to speed up drying time you can use a quick-dry top coat after painting on your base color.)
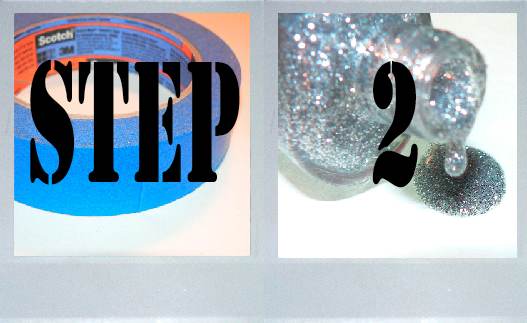
Get out your roll of painter's tape and cut off even, thin strips of tape. The number of strips per nail needed will depend on the length of your nail and how close together you are spacing the dots.
It is easier to cut even strips of tape by using a large pair of scissors and cutting width-wise across the roll of tape (in the same direction you'd use to separate a piece of tape from the roll by ripping it across, rather than lengthwise along the roll of tape). For each thin strip, roll out a small section of tape and press it down on the inside edge of the shears so you can see how wide the piece of tape you are going to cut will be. Then cut the piece of tape!

To begin laying down the pieces of tape on your nail, start at the upper edge of your nail bed, going in a diagonal direction. The angle doesn't matter, as long as each piece you lay down on your nail after the first piece goes in the same direction and is parallel to the last piece put down.
Once you have your nail covered with strips of tape going in one direction, starting at the top of your nail again, place a piece of tape perpendicular to the first piece of tape you laid down so that the two pieces of tape form a 90 degree angle.
Continue in the same pattern you did before, laying down strips of tape that are parallel to this (other) first piece of tape so that you are forming squares with the other pieces of tape that were already laid down.
Once you have your taped-out grid laid down, use your dotting tool to place dots in the center of each blank square created by the tape strips.

Just repeat Step 2 on each nail and there you go! Polka Dot Patterned Nails!
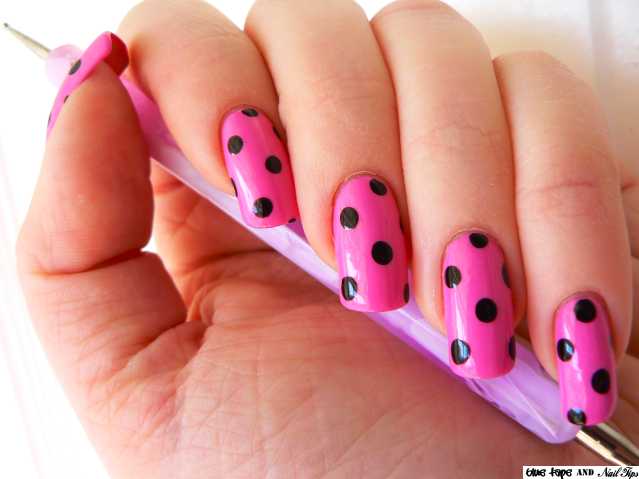
Just add top coat and you are ready to go! Simple vintage nails in 3 steps. (And for a more vintage look you can use colors like navy blue, red, or brown for the background and cream or white for the polka dots.)
Have you ever tried Polka Dot nails before?
*Supplies in this post were provided by the company or PR firm in exchange for an honest review. For more information about this blog's policy on reviews and supplies, please refer to the Disclosure Policy at the bottom of the page.*
I love polka dots esp w/ a matte top coat :)
ReplyDeleteLove it! Supper cute!! XOXO
ReplyDeletecute design!
ReplyDeletewwooh so pink i would have never thought about doing that to make the dots even. thanks for the tip!!!
ReplyDelete@Pauline - omgnoodles: I checked out your blog to see polka dots with a matte top coat - I see what you mean! It looks great matte! (And you have a great blog, btw!)
ReplyDelete@Polish Vixen Marisa: Thank you!
@NY*NAIL*DIVA: Thanks!
@Pretty: The grid definitely helps to lay out an even pattern of dots (as long as that's what you're looking for)! Thanks for the comment!
the spacing of my dots always looks weird, thanks for the tip!
ReplyDelete@whimsicalglam: Glad you found this tip useful! Thanks for the comment!
ReplyDeleteSuch a cute mani - I love polka dots!
ReplyDeleteBrowsing through ur blog..love all your nail art
ReplyDelete--Sony
http://nailscontext.blogspot.com/