Saturday, December 25, 2010

Merry Christmas with Jingle-icious Mini Lacquers

The Jingle-icious Mini pack of polishes from OPI was a Holiday Exclusive for 2010. I received this set as a Christmas gift and couldn't find any swatches online so I decided to immediately try a skittle/ombre manicure. So here is the last Christmas manicure I had this year: combining all the Holiday polishes into one manicure!


I was quite surprised to not see any pictures of the actual polishes in this set in online photo searches, so I thought I'd share my mini swatches with all of you.


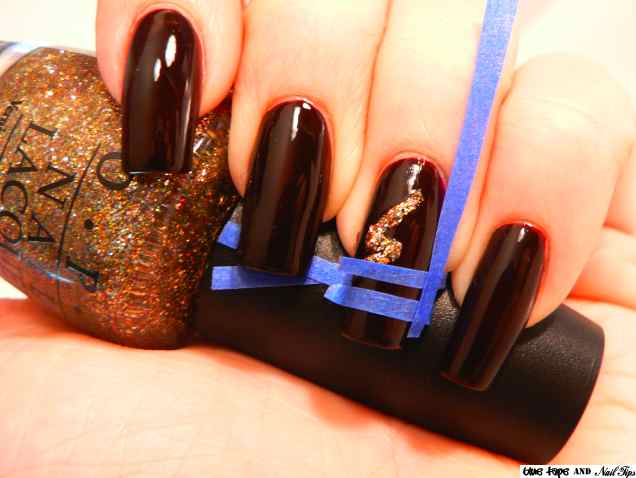
The picture below shows the order in which I had painted my nails. The first polish (on the far left) is Berry Glam Glimmer which was on my thumb and pinkie. The second polish is Merry Magenta which was on my index and ring fingers. The third and final polish (pictured far right) is Wishing for Presents which was on my middle finger.


And here are the swatches. All of the polishes were two coats with no base coat or top coat.


First up is Berry Glam Glimmer (NL 350).


This was a warm red polish. A shimmery shade that leans a bit orange.


Below is Merry Magenta (NL 352).


I was really excited about this polish when I first saw it in the box, because it was like all those glitter/glass-flecked polishes that have come out this past year. This polish almost seems like it was the missing shade to the Burlesque collection that came out for the Holiday, because this is a perfect red shade, not too orange and not too pink, and I don't remember there being a red shade with this finish and color in that collection. (It's a hint darker and more vibrant than Ali's Big Break.)


And last but certainly not least, Wishing for Presents (NL 351).


I thought this polish deserved an extra photo to showcase it's lovely shimmer. The finish on this lacquer was similar to Berry Glam Glimmer since it wasn't a glitter polish so much as a shimmery shade. When painting this on, it was almost a bit brush stroke-y, but it isn't really noticeable in the swatch photo, and if you were going to wear this as a full manicure, I don't think you would have any problems with brush strokes. In terms of the color on this one, it was almost a duo-chrome shade which I tried to capture on camera. In shaded lighting when tilting the nails with palm closed (so the free edge is visible), the center of the nail was a lilac almost periwinkle shade, while the edges of the nail were the pink/magenta shades seen in the photos above. Not very noticeable, but once I saw that I was quite intrigued with this polish.


Overall, I found this was a good mini collection for OPI to release as a Holiday set. While Merry Magenta felt the most holiday-ish with the strong red shade it turned out to be, all three colors are great, and I certainly wouldn't mind seeing them in full sized bottles (and on this note, has anyone seen these in full sized bottles?).


So that concludes the six days of Christmas manicures. Remember, candy can be Christmas-y too! Skittles manicures with Holiday colors are quite fun and festive.


On the eleventh day of Christmas my true love gave to me
eleven pipers piping
ten lords a leaping
nine ladies dancing
eight maids a milking
seven swans a swimming
six geese a laying
FIVE GOLDEN RINGS
four calling birds
three french hens
two turtle doves
and a partridge in a pear tree.

On the twelfth day of Christmas my true love gave to me
twelve drummers drumming
eleven pipers piping
ten lords a leaping
nine ladies dancing
eight maids a milking
seven swans a swimming
six geese a laying
FIVE GOLDEN RINGS
four calling birds
three french hens
two turtle doves
and a partridge in a pear tree.

Thursday, December 23, 2010

Oh, Christmas Tree


The manicure for Days 9 and 10 of the Twelve Days of Christmas is a manicure inspired by those decorative/stylized Christmas trees that are made of lights.


image from wikimedia.org


This design only takes two nail polishes to complete: the base color and the nail art color.


I chose to use OPI's All A-bordeaux the Sled! (from the Holiday 2009 collection) and OPI's Bring on the Bling.


Step 1: lay down the base color.


This is three coats of All A-bordeaux the Sled! with one coat of top coat over it.


Step 2 will begin the tree.


Take two strips of blue painter's tape and lay them down on the nail so the tape pieces will block off the area that will be the first/top-most part of the tree. You'll want the tree tip to start at about the middle of your nail, where the first stripe that makes up this stylized tree will end a little distance from the side of your nail (consider that the third stripe that is going to make up this tree will need to go a bit farther towards the edge of your nail, without touching the edge, so remember that when painting this stripe).


If you find it more helpful, you can block off the two ends of the stripes to get perfectly straight edges. The nice thing about using a dense glitter polish for the stripes of the tree, is that the glitter polishes tend to not spread out or drip down the way regular nail lacquers do (when trying to paint inbetween blue tape).


Step 3 will be a straight line that makes up the second line of this tree art design.


Use the first strip of painter's tape to block off the topmost edge of this line, where you'll put the tape just over the end of the first line, so the two ends will meet at the edge of where the first line is. The second piece of tape will block off the bottom edge of this line, so try to run the second piece of tape parallel to the first. For the third piece of tape, it will go perpendicular to the other two, where it just starts to cover the tip of the Christmas tree design, so that this second line will not go as far to the right as the first line.


Step 4 mimics the first line, except you will be connecting this third line of the Christmas tree to the second line you made.


Have the pieces of tape block off a space for the line, where the top point of this line touches the end of line two. This third stripe of the tree will go a bit farther to the left than the first line, so when laying the last piece of tape that will go lengthwise along the nail, bring it farther to the left so that when this line is complete, it will go farther to the edge of the nail than the first line.


Step 5 is adding the bottom line to this tree design.


This will be a line that will go straight across your nail, similar to the second line that makes up this tree (shown in Step 3). For this part of the Christmas tree, you will want this line to go further right than the top point of the Christmas Tree, so remember that when you are laying down the last piece of tape that runs the length of the nail (for this step).


Step 6 creates the base of the tree.


This step will be creating a little block/square shape for the base of the tree. The first piece of tape you lay down will be parallel to the bottom line of the tree shape, where then two other piece of tape will run perpendicular to the first piece of tape, marking off the square shape, leaving the top edge open to touch the glitter of the fourth line of the tree.


Once Step 6 is done, add a top coat over the design, and you have a finished look!


This is a nice stylized design that can be done on all your nails (maybe in alternating shades of red and green over a silver background?), or just as I have done, as an accent nail.


This concludes Days 9 and 10 of the Twelve Days of Christmas manicures.


On the ninth day of Christmas my true love gave to me
nine ladies dancing
eight maids a milking
seven swans a swimming
six geese a laying
FIVE GOLDEN RINGS
four calling birds
three french hens
two turtle doves
and a partridge in a pear tree.

On the tenth day of Christmas my true love gave to me
ten lords a leaping
nine ladies dancing
eight maids a milking
seven swans a swimming
six geese a laying
FIVE GOLDEN RINGS
four calling birds
three french hens
two turtle doves
and a partridge in a pear tree.

Wednesday, December 22, 2010

Christmas Flowers


For Days 7 and 8 of the Twelve Days of Christmas manicures, inspiration came from the potted plants that are used as decoration around this Holiday time: a poinsettia!


image from thescientistgardener.blogspot.com


For this manicure, I used a matte white nail polish in OPI's Alpine Snow Matte, a matte black polish in Obscurity by OPI, Nailene's Acrylic Strong Top Coat, and a few red and green flowered jewels for the nail design.


First comes the matte white polish. While this lacquer tends to need more than one coat to be completely opaque, since only the tips will be visible at the end, it is only the tips of the nails that will need a second coat of the white polish.


For Step 2, you will need to cut strips of your blue painter's tape (or use French Tip Nail Guides, if you prefer). Lay the strip onto your nail, so it just passes the beginning of where the nail connects to the skin. Make sure to press down on the tape on the side that the black nail polish can fill under. Paint your coat of black polish on the upper part of the nail, and then quickly pull off the blue tape.


The great thing about adding decals of any kind to a french manicure design, is that those decals can hide imperfections in the painting, such as the little dip in my middle finger where the black nail polish oozed under the tape because I didn't make sure the tape was pressed down before I started painting.


With Step 3, you are just adding the first of the three jewels to your nails. First, go one nail at a time and add a drop of a clear polish in the center of where the black polish meets the white polish, and then drop your jewel into the clear polish while the polish is still wet. Press down on the jewel to make sure it is secure.


With Step 4, you are just completing the row of jewels that will go across each nail. Start on each finger (again, one at a time), by putting a drop of the clear lacquer you are using to adhere your gems to your nails on one side of the centered jewel. Drop the new gemstone into the clear lacquer and press down to secure the jewel. Repeat this process on the opposite side of the middle jewel, so that there will be a total of three jewels/gemstones on each nail in alternating colors.


Step 5 is one of the most important steps when using jewels on nails - adding a top coat. If you want your jewels to stay on your nails for more than a few hours, you are going to need to do more than one coat of Top Coat.


And that is the finished design! This was a fun little festive look because the red and green jewels really pop out against the black and white background. Would you try this design?


On the seventh day of Christmas my true love gave to me
seven swans a swimming
six geese a laying
FIVE GOLDEN RINGS
four calling birds
three french hens
two turtle doves
and a partridge in a pear tree.

On the eighth day of Christmas my true love gave to me
eight maids a milking
seven swans a swimming
six geese a laying
FIVE GOLDEN RINGS
four calling birds
three french hens
two turtle doves
and a partridge in a pear tree.

Tuesday, December 21, 2010

Christmas Lights

Days 5 and 6 of the Condensed Twelve Days of Christmas manicure marathon is a simple Christmas Lights look.


Do you put up Christmas lights? I confess, I have an artificial Christmas tree that already has lights on it (built in), so I never have to worry about stringing the lights around the tree after having to set up the tree itself. Less stress...more time to paint nails.


image from thatsprettywhack.blogspot.com


For the actual Christmas light bulbs of this design, I decided to incorporate some of those glass-fleck polishes we've see often this past year. They reflect light nicely, so it's almost like having an actual bulb on your nails when you're looking at your nails in an illuminated atmosphere.


From left to right: Rimmel in 606 Dazzle, OPI in Obscurity (from the 2010 Halloween mini set), OPI in Take the Stage, OPI in The Show Must Go On!, Zoya in Mimi, and Zoya in Charla


Step 1 is laying down the base color. I chose a soft gold shade with small glitter particles in it that I thought would make a nice festive background for the lights.


If you want to keep with the glitter-flecked theme (like the polishes for the bulbs), a background of a shade like Orly Winter Wonderland would work nice and would work well to layer over since it is white.


Step 2 is where the blue painter's tape comes in. Although I did not take a picture of the actual tape, the idea is fairly straight forward:


Taking a strip of painter's tape from the roll that is at least 2 inches in length, using a permanent marker, draw a wavy line down the middle of the tape from one cut end to the other (rather than top to bottom).


I didn't take a picture of the actual tape on my nails because this step will differ a bit for each nail length. The longer the nails, the more height you want your curves to have. Once you've decided on a height pattern and drawn it onto the tape, cut along the line you have just drawn. You will need both pieces of tape, wherein you will use each half of the the original piece to mark off the top and bottom of the wavy "light cord". Cut both pieces of tape together in chunks (from the whole piece you've drawn and cut) that span wide enough to cover the whole nail straight across. This will leave you with five separate sets of top and bottom pieces for each nail on one hand.


Once you have painted on your wavy "light cord" in Step 2, you can move on to Step 3.


On a new piece of painter's tape cut from the roll, draw little light bulb shapes at the edge of the tape, so the bottom of each bulb touches the bottom of the tape. You will use these shapes to fill in on the nail, by placing each bulb shape with the open end against a curve in your wavy cord, and then close the form by adding a single newly cut strip of blue painter's tape, so no nail polish seeps where it was not wanted.


And after adding top coat, here is the final look.


The only thing I wouldn't recommend is using a matte polish for the light bulb cord (the black wavy line) like I did, because the lines were more rough than they would have been had I used a regular black polish (that dries at a regular speed).


This is a fun look that everyone can try at least once (even if it's just to then decide this look isn't for you). It's bright and cheery just like Holiday lights are.


This concludes Days 5 and 6 of the Twelve Days of Christmas.


On the fifth day of Christmas my true love gave to me
FIVE GOLDEN RINGS
four calling birds
three french hens
two turtle doves
and a partridge in a pear tree.

On the sixth day of Christmas my true love gave to me
six geese a laying
FIVE GOLDEN RINGS
four calling birds
three french hens
two turtle doves
and a partridge in a pear tree.

Monday, December 20, 2010

Silver Winter Wonderland

Days 3 and 4 of the Twelve (condensed) Days of Christmas consists of a glitter gradient manicure reminiscent of falling snow.


If you think of a silver winter wonderland, what comes to mind? Landscape covered in snow and ice - so frozen it gleams silver in the minimal sunlight?


image from wikimedia.org


Well if you try to Google the words "Silver Winter Wonderland" some of the first few images that come up are of silver jewelry with winter motifs. Not really what I had in mind for this manicure, but the above picture does the trick to bring forth thoughts of snow glazed countryside.


For this manicure, you'll need four nail polishes. A base color, and then three varying foil and glitter-like shades all in the same color range.


For this manicure, the colors I chose were (from left to right) Revlon Top Speed Chrome in PetalChrome (all one word on the label for some reason), Revlon Top Speed Chrome in Lily Chrome, Love & Beauty in Silver (this is a dense silver micro glitter, similar to Orly Dazzle), and Love & Beauty in Silver (and although this one has the same name on the label as the last one, this last polish is a regular silver glitter polish made up of round-ish particles of silver glitter in a clear base).


For Step 1, simply paint on a coat of your base color. For this manicure, I don't recommend adding a top coat, because that will interfere with layering the other colors over the first layer and how well the layers mesh together.


This is one to two coats of PetalChrome without a top coat.


Step 2 consists of brushing the tips of your nails in the silver foil polish to create a base/starting line that will be a solid silver background for the rest of the gradient manicure.


You can do this freehand, and it does not matter if you have straight lines, because it will be blended into the other layers on top of this one.


Also, consider how long your nails are, and how far up you want your glitter gradient to travel on the nail, for how high you want this silver stripe to be on your nails.


In Step 3, you will take your dense silver micro-glitter polish and do a stripe across each nail that reaches to about one forth up the nail. Make sure to paint this coat so the glitter stays dense, dragging the brush from left to right (or right to left) across the tip of your nail (rather than from top to bottom).


After the last step has dried a bit (but not completely dry), take the same dense silver micro-glitter polish you used for the last step and using an upward motion, start at the bottom tip of your nail and drag the brush up, making sure that the brush has a minimal amount of polish on it, so that after each single stroke of the brush, there is almost no nail polish on the brush. The less polish on the brush before each stroke, the easier it will be to layer on the micro-glitter, so that it does not become too dense at the top of the gradient.


Paint up to about two-thirds of your nail, leaving the top third still uncovered by silver glitter.


For this final step, the blue painter's tape is optional, but I find it helpful to control how far the last glitter polish travels without accidentally painting the whole nail.


Using the regular-sized-particle silver glitter, sweep the brush in an upwards stroke along the nail to the nail bed, up to about four-fifths of the nail, so that from about the moon of the nail upwards is not covered in any silver glitter. Feel free to add a bit more of this larger-particle silver glitter at the end of your nail if you so desire, while still keeping the glitter sparse at the top of the gradient.


And here is the final look when a top coat is added.


To create this silver snowy wonderland on your nails, no sponge is needed for the gradient. I find the blue chrome polish compliments the silver glitter gradient nicely for a background shade, emphasizing the silver look to the nails. If you try this design, what shades would you use?


And this concludes Days 3 and 4 of the Twelve Days of Christmas Manicures.


On the third day of Christmas my true love gave to me
three french hens
two turtle doves
and a partridge in a pear tree.

On the fourth day of Christmas my true love gave to me
four calling birds
three french hens
two turtle doves
and a partridge in a pear tree.