Wednesday, August 15, 2012

Deborah Lippmann True Blood Collection


Hello!  Deborah Lippmann seems to be coming out with quite a few collections that are exclusive to HSN.  Her last major collection, Footloose, was one I totally missed out on.  (Even when it was on sale on the HSN website!)  So this time I promised myself that I would order the next collection at the first opportunity I was able to.  And now this came in the mail today!  So I wanted to share it with you as quickly as possible.

Let's jump right to the photos:


 Let It Bleed, 2 coats, Deborah Lippmann base coat underneath, no top coat

Let It Bleed is the special polish out of the whole Forsaken collection because not only is it being released with Deborah Lippmann's first lipstick, but also because it is infused with the new Forsaken fragrance that is named after the collection.  The prominent notes of the fragrance seem to be floral with just a hint of something else.  Not musky, but rather a clean smell overall.


 Human Nature, 2 coats, no base coat, no top coat

Human Nature is the neutral shade that came in the two piece collection that is centered around the character of Sookie Stackhouse from the True Blood series.  This is described on the HSN website as a "mortal putty taupe", which is a great description for this polish.  In real life, it is hard to tell if this polish leans warm or cool, because different lighting situations show this shade off differently.


 Fairydust, 2 (thick-ish) coats, no base coat, no top coat

Fairydust is the other half of the Sookie Duo.  While this polish may just be meant as a top coat to add sparkle to any base color, this polish does more than just sparkle.  Having a strong opalescent quality to it, this white glass-flecked polish flashes reddish-orange to slight shades of pink in direct light.  To see more of the effect, click on the photos to enlarge them.


 1 coat Fairydust over 2 coats of Human Nature, no top coat, no base coat

Since these two came together in the same package, it only seemed right to layer them over one another!  If you love the look of Fairydust but hate the VNL (visible nail line), then layer it over Human Nature and you get the same great glow without the VNL.


1 coat Fairydust over 2 coats Let It Bleed, Deborah Lippmann base coat, no top coat

While I was getting carried away layering Fairydust over all the polishes, I thought it only fair to show you what it looks like over a darker color.  Here I did a little more experimenting, where from let to right in the photo, I have on a think coat of Fairydust, a medium coat, and a thick coat.  As you can see, Fairydust has a pretty thick consistency, where one thick coat almost wipes out the color underneath!  A thin coat really helps to bring shine and unique reflections to the color it covers.


The last nail polish set is a triple pack of mini bottles, which I did not order.  The Forsaken lipstick that comes with the nail polish Let It Bleed is a nice deep shade of rouge that looks like it will be flattering on many skintones.  I did try to swatch the lipstick, but it wasn't working out well enough to show what shade the lipstick is, so I had to scrap those photos.  What I can tell you on the color of the lipstick is that while it appears similar to the shade of Let It Bleed in the bottle, once on your lips, it does not look as dark.  This is a rather nice effect because it makes the lipstick more wearable.

Another great thing with this collection is that all the bottles have the "deborah lippmann TRUEBLOOD" logo in silvery-white (and red) on one side, while the opposite of the bottle has the original "deborah lippmann" logo in black.  This makes for a nice effect for the range of light and dark shades available.

Well I hope that helped with your future shopping decisions!  If you want to pick up any of this collection I suggest you run over to HSN.com right now before anything is sold out!

Saturday, July 21, 2012

Ciate Velvet Manicure in Blue Suede


Thursday I stopped into Sephora to pick up the Nails Inc Sprinkles Collection and a helpful sales associate showed me this new collection from Ciate.  Similar to their Caviar Nail Kits, the Velvet Manicure comes in a kit that includes one bottle of polish, "crushed velvet powder" in a corresponding color, and a small brush to dust off excess powder.


The kits come in three different shades: a berry, a deep blue, and a gray.  The kit I chose is called Blue Suede and the photo above shows how the kit is packaged.  (Also within the kit is an extra tray that is meant for you to use to collect the excess powder that falls off when you are applying it to your nails.)


Now in case you haven't seen this trend before, in the same manner as a caviar manicure, you paint on one coat of your base color on all your nails and let it dry.  Then, going one nail at a time, you paint on a second coat of the base color, then quickly try to sprinkle the powder over the whole nail.  Top coat would change the effect, so it is not recommended to add.


I've included a few different photos for you to see how the effect looks up close.  Because these photos are macro photos, you can also easily see how messy this can become - there are still numerous little blue "velvet" hairs on my fingers and the nail polish bottle, even though I used the brush in the kit to dust off the excess powder.


In the below photo you can get a better sense for the soft-look this gives nails.  Although this photo is a bit out of focus, it demonstrates how appropriate the name "Velvet Manicure" is, because this look leaves your nails with a soft, fuzzy-looking quality.


Now just for comparison purposes, I have tried using flocking powder on my nails before, and while that gave a similar effect, I feel that the "crushed velvet powder" in this kit is a bit more fine than flocking powder you can find at a craft store, making it a bit more appealing to wear.

Each kit retails for $19US and is now available in Sephora stores, or you can check out the complete selection on Sephora.com HERE.

The positives of these kits include:
  • The powder to go on the nails matches the polish color perfectly
  • The small brush included in the kit is useful for brushing off excess powder (including the stuff that ends up getting stuck down the sides of your nails)
  • I particularly like the color options available, and although I've only tried the Blue Suede kit, I know I'll wear the nails polish that came in the kit (3am Girl) by itself, so you can get use out of the kit even without incorporating the powder aspect of it into your manicure
The negatives of these kits include:
  • At $19US these kits are less costly than the Caviar manicure kits, but this price might still be steep for many people
  • The kit does come with a brush to dust off excess powder, but no matter how much dusting you do, you'll still find excess velvet hairs floating around on your hands, clothes, etc.
  • This is a fun nail art/trend, but can really only be warn in a temporary setting because of the nature of the crushed velvet powder.  Water and any daily activity will diminish the effect (though in some cases, this may last longer on your nails than a caviar manicure)


So what do you think of this nail kit?  Have you already seen this at Sephora stores?  Do you think you'll be picking up any of these kits?

Wednesday, July 4, 2012

Stars and Stripes


4th of July is here again!  So it's time for a nail design to celebrate!


The colors used for this nail design were the requisite red, white, and blue.  For the blue I used Sally Hansen Complete Salon Manicure in Thinking of Blue, which was a great blue to use because one coat offered complete coverage, where the color underneath does not show through the blue on top.  For the white, OPI's Alpine Snow - Matte was used.  For the red, a mid tone bright red was used from American Apparel in Downtown LA.


Step 1 was two coats of the white.  Whatever white polish you choose to utilize, that will be the first color you will paint on your nails as your base color.  If you are not using a matte polish -- one that dries fast -- then it would be beneficial to use a fast drying top coat after you paint on the white polish to speed up the wait time between the first step and the second step.  As a side note to painting your nails with the white polish, you don't need to bring the white polish all the way to the beginning of your nail, because in Step 2 you will be painting over most of the white and covering up the upper part of your nail in blue.


Step 2 is where the blue painter's tape comes in.  You will just need two small strips of tape per each nail (unless you decide you want more red stripes on each nail).  Depending on your nail length you can use wider strips of tape to mark off the areas where the white stripes will be.  Going nail-by-nail lay on the two pieces of tape where each strip is parallel to the other.  Paint one color then the other color as quickly as possible and pull off the tape in the direction each strip of tape is laid down on the nail.  (You want to work one nail at a time and take off the tape as quickly as possible, because the longer you leave the tape on the nail, the more the nail polish you painted on over the tape starts to dry and sticks to the tape leaving "strings" of polish when you try to pull off the tape.)


Here for Step 3 you add your stars!  The stars used for this nail design were nail studs from Kiss called "Nail Artist - metallic" that were purchased at Walgreen's.  Each stud has a sticky backing, but you'll still want to press the star into your nail polish (that's still wet) to hold the star in place. 
If you do decide to use stars on this nail design, you can make everything look more uniform by making sure one point of each star is facing up and centered on your nail.


Step 4 is to add top coat!  This is essential to keep the stars stuck to your nails.  Here you may need to do more than one coat of top coat in order to seal in the stars.  In order to try and make sure your colors do not bleed together (especially over the white), paint the top coat on your nail diagonally in the direction the polish is drawn so the brush is not dragged down the nail blending one color into the next.

And once your top coat is dry, you'll have your 4th of July nails that have both the stars and stripes that are associated with the red, white, and blue of this day.

Monday, June 25, 2012

Chanel Frenzy 559


The second color I have to share with you from the Chanel Autumn 2012 collection is Frenzy.

 (two coats, top coat and base coat, ott light)

In the above photo you can see the strong taupe/beige color in this polish.

 (two coats, no top coat or base coat, indirect sunlight)

In the above photo, a bit of the nails underneath can be seen.  Although two coats of nail polish can give full coverage, this polish is more sheer than a normal creme (ie. Vertigo), yet the thicker the polish you layer on, the more likely bubbles are to appear, so it's better to leave it sheer. 

 (two coats, no top coat or base coat, indirect sunlight)

...And one last photograph (below) just for reference.

 (two coats, no top coat or base coat, indirect sunlight)

So what do you think of Frenzy?  This is supposed to be the new "it" color for Fall 2012.  Personally I haven't decided if I like Vertigo better because these two are so different (in finish and color).  Color comparison wise, this nail lacquer is similar in shade to OPI's Skull & Glossbones.

Chanel Frenzy 559 retails for $26US and should be available at your local Chanel counter within the next two weeks or soon there-after.


Chanel Vertigo 563


The Chanel Autumn 2012 Collection included 3 new colors, one of which is Vertigo.

First of all, don't confuse this lacquer with Chanel Vertigo 60. I (not having a very large collection of Chanel lacquers) did not realize there was an older Chanel nail color also called Vertigo until I went to look up photos online and almost bought the older edition off ebay by mistake.

(two coats, no top coat or base coat, indirect sunlight)

In most lighting, this is what Vertigo looks like (as seen in the above photo).


(two coats, no top coat or base coat, direct afternoon sunlight)

Vertigo 563 is supposed to have a red hue - and this polish does have the requisite Chanel secret shimmer, which can only be seen in bright direct light.

(two coats, base coat and top coat, ott light)

To get the full effect of the shimmer, click on each photo to enlarge it.

(two coats, base coat and top coat, incandescent light bulb)

The red shimmer can be seen in the above and below photo just around the shine on each nail caused by the light bulb reflection.


(two coats, top coat and base coat, incandescent light bulb)

Chanel Vertigo 563 is most like Chanel Paradoxal 509.  A dark smoky color with slight shimmer.  In most lighting the polish looks dark gray with a slight brown/purple shade mixed in.  Not only is Vertigo a tad darker than Paradoxal, the main difference lies with the shimmer running through the polish: Paradoxal is purple and Vertigo is red.

In regards to release dates of the Fall Chanel 2012 line, according to the representative at my local Chanel counter inside Nordstrom's, the line has already been shipped to stores and should arrive in 1-2 weeks or soon there-after.  I was able to find the collection at a Chanel boutique, so if you want this collection early, try contacting actual Chanel stores (rather than the counters inside department stores) to see if they have it in stock.

Chanel Vertigo 563 retails for $26US.  So, do you think this polish is worth the price tag?  And will you be checking out your local Chanel retailer in the next few weeks?


Saturday, March 17, 2012

Shimmering Shamrock


Happy St. Patrick's Day!


image from commons.wikimedia.org


This manicure was inspired by the three leaf clover - the shamrock!  As the story goes, St. Patrick used the shamrock to explain the Trinity to the Irish when converting them to Christianity.  That's why I thought it would make a great St. Patrick day manicure!


For this manicure both Nubar Reclaim and NARS Zulu were used.


For Step 1, begin with two coats of Nubar Reclaim, followed by a quick dry top coat.


Step 2 is where the blue tape comes in!  Cut a piece of blue painter's tape about 1/2 to 1 inch in length.  First fold the strip of painter's tape in half.  Without letting the ends of the tape stick together, fold the tape the opposite way (with the sticky sides on the outside) so the tape strip is now a fourth as wide as it was to begin with. (To get a better idea of this concept, refer to the above image.)

Once you have the tape folded together, using a permanent marker, draw half a heart onto the folded edge of the tape (as seen above).  Cut out the heart following the drawn line, using the sticky (open) sides to help manuver the piece of tape while cutting out the heart.

Then slowly peel open the strip of tape, and you have a whole heart!  You will need to repeat this process three times to make a complete shamrock for one nail (and thirty hearts if you want to do all ten nails).


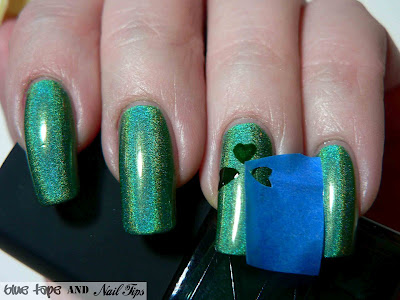
Using the heart you have just cut out, use the folded line that goes through the center of the heart to line up the heart in the center of your nail.  Make sure your piece of tape is pressed down firmly and paint Zulu both forwards and then backwards across the open heart (to make sure all of the open space is filled in).


Now using the second heart you cut, cut along the right side of the heart leaving a sliver of tape between the heart and the edge of the tape (so any excess nail polish you paint inside the heart that spills over will not paint onto the nail).  This diagonal will also help you line up the second heart where you can make sure the point of the second heart is just below the point of the first heart. 

Also remember to try not to put the second strip of tape over the first heart you painted because if you are painting one heart right after the other, the first heart will not yet be dry.


 Step 5 will be the last heart to add.  For this step, follow the same idea of Step 4, where you will cut along the diagonal following the side of the heart, but this time you will be cutting along the left side.  Try to not only line up the bottom tip of the heart below the tip/point of the first heart, but also try to line up the third heart as a mirror opposite of the second heart.


For Step 6, you will need a pair of nail clippers!  (I recommend using toenail clippers.)  Cut three (straight) strips of tape where one is wider and longer than the other two.  Taking the wider strip of tape, cut once along the length of the piece of tape (in the center of the strip) using your nail clippers, so you create a curved slit in the direct center of the strip of tape.  Either below or above the center slit you have created, cut another line with your nail clippers (following the same curved direction) so you have two curved slits.  Using scissors, cut the dividing sliver of tape between the two slits off at the end and beginning of both slits so as to create a curved line that you will then fill in with nail polish.  

Place the piece of tape with the curved line-gap where the start of the gap is just below the three points of the hearts in roughly the middle of your nails.  Use the other two strips of tape to mark off the length of the gap you are going to fill in, considering the fact that this painted gap will be the stem of the shamrock.


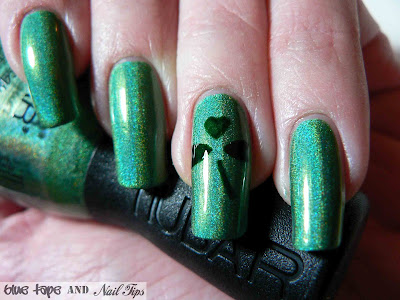
And now you're done!  Just paint with top coat to seal the shamrock once the design is dry!  The above picture is your final look - a shimmering shamrock for one (or all) of your nails!


So what do you think of this nail design?  Will you try it?

On another note, you can follow Steps 2 and 3 to create simple hearts to spice up any manicure if you don't have access to a Konad (or other brand) stamping kit.  This also works great if you want to use a sheer polish (like Zulu) to create a heart-studded manicure, since those polishes that are more jelly-like in quality tend to not transfer well when stamping.

Thanks for stopping by!  I hope you enjoyed this post!  (And a sincere thank you to all the new followers who have joined, and those that have stuck around!)