Showing posts with label Revlon. Show all posts

Saturday, December 24, 2011

Wrapping Paper with Revlon

Here is a quick and easy Christmas nail design: Wrapping Paper (and using only Revlon polishes)!


Wrapping paper usually features a repeated pattern, and a red plaid pattern is perfect for Christmas nails!
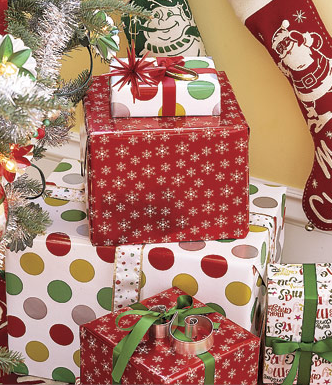


image from countryliving.com


For this nail design five colors were needed. From left to right (all from Revlon): Mon Cherry, Crimson Shimmer, Comet, Carbonite, and Powder Puff.


Step 1: Paint on your base color. This is two coats of Powder Puff followed by a quick drying top coat to speed up the dry time. (Also, since the base color will be mostly covered up, two coats of any color should be sufficient, since streaking isn't noticeable under the colors that will go on top of this.)


For Step 2 (and Step 3 to follow), you will need to cut very thin strips of the blue painter's tape to begin the plaid pattern. In order to cut thin strips that are relatively even, it is easier to cut off a small section of painter's tape from the whole role (about 1 inch/2.5 cm) to then cut into the fine strips that will be used. After you have a small section of painter's tape cut from the roll, decide on how wide you want each strip of tape to be, then using the edge of the scissors as a guide for the width of the strip, press the tape strip onto the scissors so it sticks to one of the cutting-edges of the scissors. By pressing down the strip of tape onto the scissors - rather than holding the piece of tape with one hand to cut with the other - you can judge how little or how much of each tape section you want to cut off.

After cutting your consecutively small strips of tape, lay the strips down on each nail in a pattern where the negative space between the tape strips will repeat in a small-large pattern, where the small section is where Carbonite will be painted, while the large section is where Mon Cherry will be painted. Remember to paint one nail at a time, using first one color then the other, so that you can peel off the painter's tape as soon as you are done painting a nail to ensure a clean edge (that the nail polish will not dry and pull up with the painter's tape).


Step 3 uses the same small strips of tape as Step 2. Here you will lay the strips of tape going in the opposite direction as the strips in Step 2, so as to create the plaid effect. The easiest way to make sure the tape strips you are laying down go in the opposite direction of the original tape strips is to choose one or two main stripes of nail polish that you painted on in Step 2 and try to get these new tape strips to run perpendicular to those stripes, creating 90 degree angles.

Step 3 is the last application of color and uses the tinted/glitter polishes to lay over the other colors, so as to show the pattern through the polish to achieve the plaid look. If you are not using these specific Revlon polishes, look for polishes that are tinted/jelly-finish rather than a creme finish, so as to achieve the look of a real plaid pattern.


And here is the finished product:


Once you think your layers of polish are sufficiently dry, add a top coat!


So what do you think of this Christmas nail design? What are you wearing on your nails for Christmas?

Monday, December 20, 2010

Silver Winter Wonderland

Days 3 and 4 of the Twelve (condensed) Days of Christmas consists of a glitter gradient manicure reminiscent of falling snow.


If you think of a silver winter wonderland, what comes to mind? Landscape covered in snow and ice - so frozen it gleams silver in the minimal sunlight?


image from wikimedia.org


Well if you try to Google the words "Silver Winter Wonderland" some of the first few images that come up are of silver jewelry with winter motifs. Not really what I had in mind for this manicure, but the above picture does the trick to bring forth thoughts of snow glazed countryside.


For this manicure, you'll need four nail polishes. A base color, and then three varying foil and glitter-like shades all in the same color range.


For this manicure, the colors I chose were (from left to right) Revlon Top Speed Chrome in PetalChrome (all one word on the label for some reason), Revlon Top Speed Chrome in Lily Chrome, Love & Beauty in Silver (this is a dense silver micro glitter, similar to Orly Dazzle), and Love & Beauty in Silver (and although this one has the same name on the label as the last one, this last polish is a regular silver glitter polish made up of round-ish particles of silver glitter in a clear base).


For Step 1, simply paint on a coat of your base color. For this manicure, I don't recommend adding a top coat, because that will interfere with layering the other colors over the first layer and how well the layers mesh together.


This is one to two coats of PetalChrome without a top coat.


Step 2 consists of brushing the tips of your nails in the silver foil polish to create a base/starting line that will be a solid silver background for the rest of the gradient manicure.


You can do this freehand, and it does not matter if you have straight lines, because it will be blended into the other layers on top of this one.


Also, consider how long your nails are, and how far up you want your glitter gradient to travel on the nail, for how high you want this silver stripe to be on your nails.


In Step 3, you will take your dense silver micro-glitter polish and do a stripe across each nail that reaches to about one forth up the nail. Make sure to paint this coat so the glitter stays dense, dragging the brush from left to right (or right to left) across the tip of your nail (rather than from top to bottom).


After the last step has dried a bit (but not completely dry), take the same dense silver micro-glitter polish you used for the last step and using an upward motion, start at the bottom tip of your nail and drag the brush up, making sure that the brush has a minimal amount of polish on it, so that after each single stroke of the brush, there is almost no nail polish on the brush. The less polish on the brush before each stroke, the easier it will be to layer on the micro-glitter, so that it does not become too dense at the top of the gradient.


Paint up to about two-thirds of your nail, leaving the top third still uncovered by silver glitter.


For this final step, the blue painter's tape is optional, but I find it helpful to control how far the last glitter polish travels without accidentally painting the whole nail.


Using the regular-sized-particle silver glitter, sweep the brush in an upwards stroke along the nail to the nail bed, up to about four-fifths of the nail, so that from about the moon of the nail upwards is not covered in any silver glitter. Feel free to add a bit more of this larger-particle silver glitter at the end of your nail if you so desire, while still keeping the glitter sparse at the top of the gradient.


And here is the final look when a top coat is added.


To create this silver snowy wonderland on your nails, no sponge is needed for the gradient. I find the blue chrome polish compliments the silver glitter gradient nicely for a background shade, emphasizing the silver look to the nails. If you try this design, what shades would you use?


And this concludes Days 3 and 4 of the Twelve Days of Christmas Manicures.


On the third day of Christmas my true love gave to me
three french hens
two turtle doves
and a partridge in a pear tree.

On the fourth day of Christmas my true love gave to me
four calling birds
three french hens
two turtle doves
and a partridge in a pear tree.