Showing posts with label white. Show all posts

Saturday, September 6, 2014

OPI Gwen Stefani Holiday 2014 Nail Effects


Are you ready for Holiday collections yet?  For the Winter of 2014, OPI is releasing 3 separate collections in collaboration with Gwen Stefani.  The collection I have to show you today is the glitter collection.

Let's begin with a look at the solid color polishes that come with the collection for you to layer the glitter over:


no base coat, 2 coats Rollin' in Cashmere, no top coat


First up is Rollin' in Cashmere.  A frosty yellow-gold.  To me, this looks exactly like I though 50 Years of Style from the recent Ford Mustang collection would look.  I don't have them to compare, so you'll have to tell me if you agree or disagree.


no base coat, 2 coats Rollin' in Cashmere, no top coat


Next up is Unfrost My Heart.  Made up of dense, tiny silver particles to give you a chrome finish.  Like Rollin' in Cashmere, I think this polish looks very similar to a previous OPI polish.  What do you think: could this be a dupe to My Signature is DC from the Coca-Cola collection?


no base coat, 2 coats Unfrost My Heart, no top coat


How about another photo to help you decide:


no base coat, 2 coats Unfrost My Heart, no top coat


Ok, now on to the part you (probably) came here to see: the glitters.


no base coat, 1 coat of So Elegant over 3 coats of My Boyfriend Scales Walls by OPI, no top coat


This is So Elegant.  Large gunmetal hexagonal glitters, medium gunmetal hexagonal glitters, small matte black hexagons, and micro matte black dots are all suspended in a clear base.


no base coat, 1 coat of So Elegant over 3 coats of My Boyfriend Scales Walls by OPI, no top coat


Next up is I'll Tinsel You In.  Yay!  An easy-to-apply black and white glitter-topper from a mainstream brand.


base coat, 1 coat of I'll Tinsel You In over 2 coats of My Turn by Sinful Colors, no top coat


Honestly, I thought this was just a black and white glitter.  Upon closer inspection, this polish seems to fit its name perfectly.  There are large matte white glitter pieces, matte white bar glitter, small matte black hexagons, micro matte black dots, and… what  appears to be silver chrome bar glitter, thus making it look like this polish has actual tinsel in it!


base coat, 1 coat of I'll Tinsel You In over 2 coats of My Turn by Sinful Colors, no top coat


Snow Globetrotter was the polish I was most interested in when I heard about this collection, and it doesn't disappoint!


base coat, 1 coat of Snow Globetrotter over 2 coats of Whipped by Sinful Colors, top coat


Layered over black, this polish looks like a mix of crushed jewels and galaxies on your nails!  A combination of opalescent hexagons in large, medium, small, and micro, along with matte white hexagonal glitter in sizes large, medium, small, and micro all in a clear base.


base coat, 1 coat of Snow Globetrotter over 2 coats of Whipped by Sinful Colors, top coat


In the sun, the opalescent glitter pieces really catch the light!
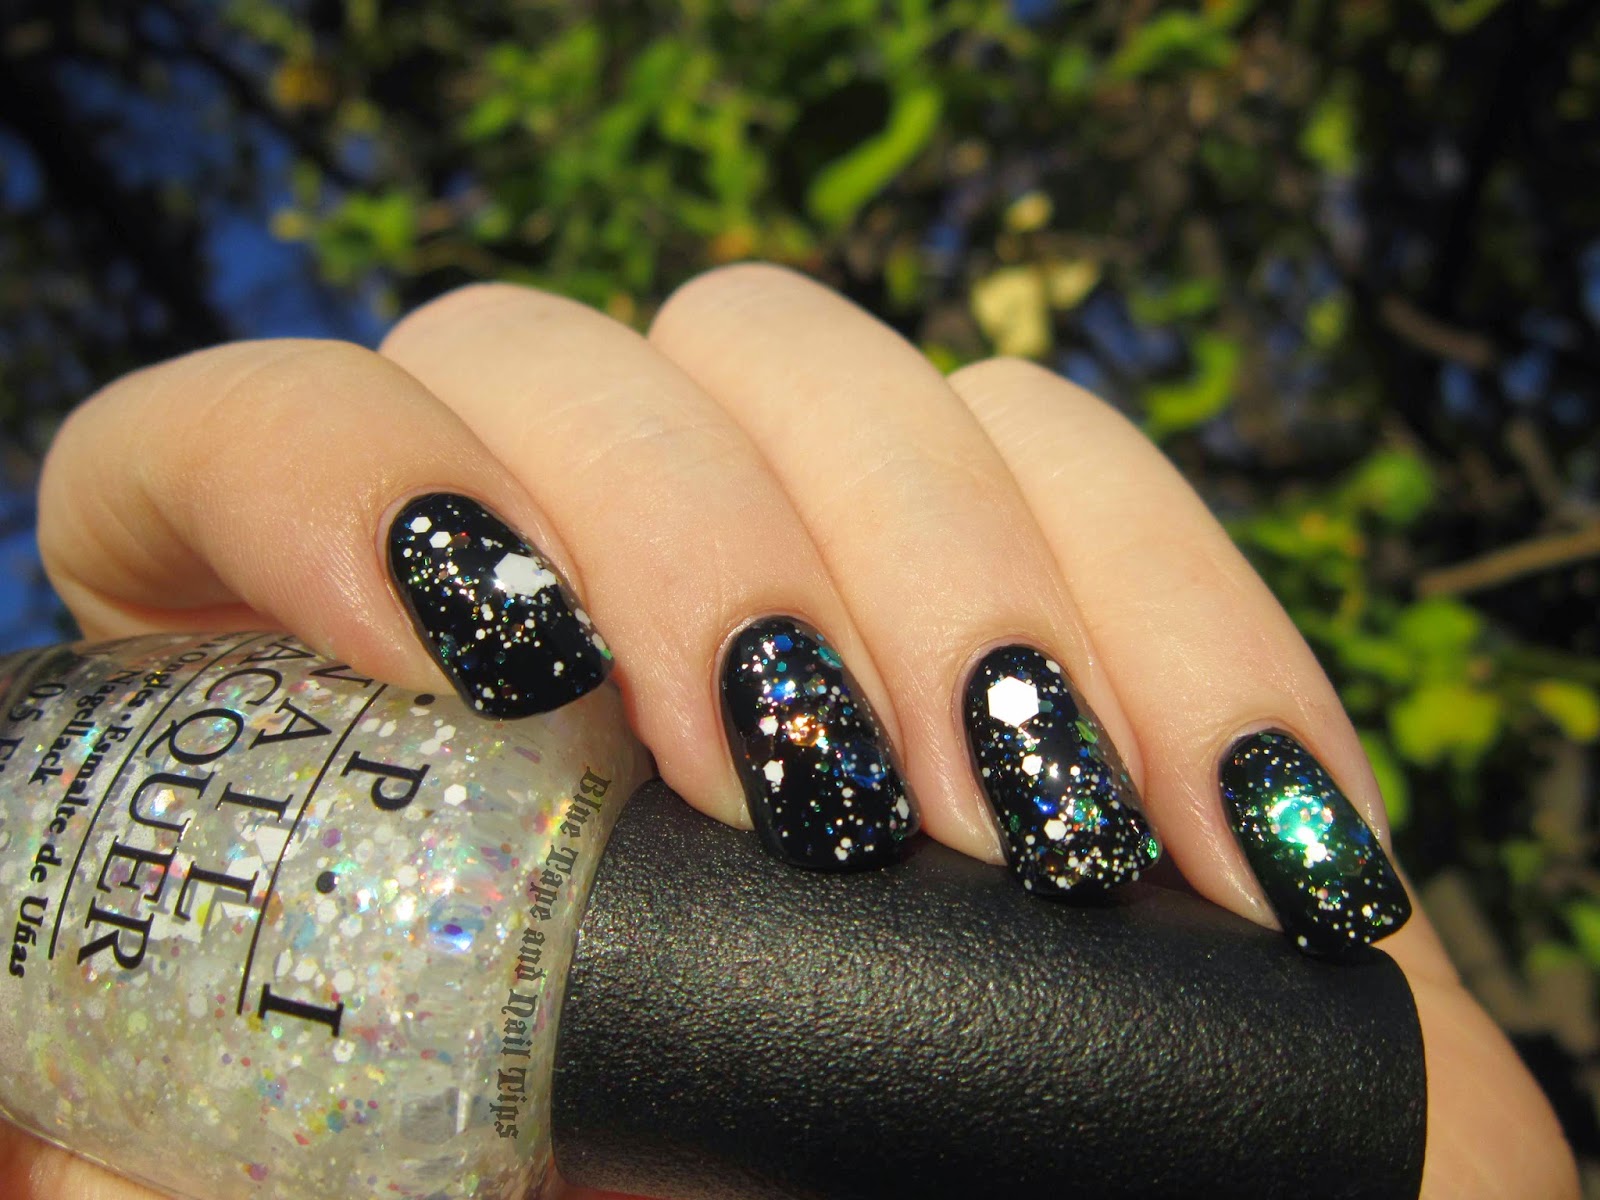

base coat, 1 coat of Snow Globetrotter over 2 coats of Whipped by Sinful Colors, top coat


Last but certainly not least, here is Comet in the Sky.  I tried to save the best for last, and I think you may agree.


no base coat, 1 coat of Comet in the Sky over 2 coats of You Got Me Started by Deborah Lippmann,  no top coat


Comet in the Sky is the twin to Snow Globetrotter in that it features multiple sizes of matte glitter and multiple sizes of opalescent glitter in a clear base.


no base coat, 1 coat of Comet in the Sky over 2 coats of You Got Me Started by Deborah Lippmann,  no top coat


The matte black hexagonal glitter comes in size large, small, and micro, while the opalescent glitter comes in large, medium, small, and micro, all in a clear base.


no base coat, 1 coat of Comet in the Sky over 2 coats of You Got Me Started by Deborah Lippmann,  top coat


The strong opalescent colors are most prominent in regular indoor (tungsten) lighting, unless you want flashes of sparkle, which you can get by wearing this glitter in the sun.  If you see below, you'll notice that the opalescent glitter on the bottom of my ring finger which looked clear-tinted yellow two photos above now glows a purplish-blue.


no base coat, 1 coat of Comet in the Sky over 2 coats of You Got Me Started by Deborah Lippmann,  no top coat


And there you have it!  

The coverage in each of these glitter polishes for just one coat was great.  No fishing for the larger glitter pieces was necessary!  The glitter applied smoothly and laid flat on the nail when dry.

I bought this collection on eBay for relatively the same amount it would cost at a beauty supply store, so if you can't wait for this collection like I couldn't, try checking online sellers, since this collection hasn't been officially released yet.  You can buy it at Ulta or JC Penney's (or any of your preferred retailers) when it becomes available in the fall.  But, you know, why wait when you can buy it online.  Right now.  Go!

But first, share your opinions!  What do you think of this Holiday collection?  Better than the last?  What do you think of this Gwen Stefani collection compared to the last?

Wednesday, August 27, 2014

Nails Inc NailKale and Illuminator Review


Kale and nail polish.  Who would have thought they would come together in one bottle?  Nails Inc. has jumped on the kale bandwagon and created a line of nail polish that are enriched with kale extract.  So now you can get the benefits of nail polish and kale all in one bottle!

Lets look at one of the colored polishes in the line and then we will look at the Illuminator polish that is meant to work as a nail brightener.

"…get the benefits of nail polish and kale all in one bottle!"


 no base coat, 2 coats Nails Inc. NailKale in Bruton Mews, no top coat

Ok, first off, look at that shine!  This is without top coat.  That's right, this is dry to the touch and is more shiny than it would be with a top coat.


 no base coat, 2 coats Nails Inc. NailKale in Bruton Mews, no top coat

Now indoors, and in most lighting, this nail polish is a green-leaning black.  Like a creme version of Nars Zulu, lighting brings out the green, so the more light, the more green that shows up in the polish.


 no base coat, 2 coats Nails Inc. NailKale in Bruton Mews, no top coat

You can see in the above picture, in direct mid-day sun, this polish is a true forest green creme.  And it is still very reflective and shiny.  Now on to the Illuminator.


"Now on to the Illuminator."


 no base coat, 3 coats Nails Inc. NailKale Illuminator in Bright Street, no top coat

Nails Inc. has a few new products besides colored polishes in the NailKale line.  The NailKale Illuminator is one of those polishes.  I consider it separate from the colored polishes because: (1) it has an extra word on the front of the bottle denoting it is an "Illuminator," (2) it has it's own tab on the Sephora website separate from the other polish color options and separate from the NailKale base coat, and (3) you're supposed to wear it like a colored polish (so, by itself) but I think it's great for layering as well (see below for what it looks like layered).


 no base coat, 3 coats Nails Inc. NailKale Illuminator in Bright Street, no top coat

This is a gem of a polish just for the blue "glow" alone.  Unfortunately sizing down the file size of each photo takes away from some of the awesome shine power, but click on any photo to enlarge it to see the great blue shimmer that streaks through this milky white polish.


"…click on any photo to enlarge it…"


 no base coat, 3 coats Nails Inc. NailKale Illuminator in Bright Street, no top coat

In direct sunlight the shimmer is amazing!  


 no base coat, 1 coat Bright Street over 2 coats Bruton Mews, no top coat

And now to see it layered!


 no base coat, 1 coat Bright Street over 2 coats Bruton Mews, no top coat

The blue shimmer in the Illuminator really comes out over a dark polish, and layering it over Bruton Mews really makes the blue shimmer sparkle as the whole nail looks blue.


no base coat, 1 coat Bright Street over 2 coats Bruton Mews, no top coat


And there you have it!  This is what you get when you mix kale with nail polish.


Both polishes were beautiful.  While Bruton Mews isn't a unique color, it is still a beautiful color and is worth purchasing for the glossy shine alone.  The Illuminator Bright Street is supposed to be "a nail polish with iridescent pearls that brighten the pink nail bed, leaving the appearance of whiter tips and healthier nails" (according to the Sephora website).  It certainly does whiten my nails, as it is a glossy white in color.  The blue shimmer adds to the appeal, rather than distract or detract.  The only downside to the Illuminator is the slightly slow dry time, but a quick-dry top coat will solve that problem in an instant.

Nails Inc. touts the NailKale polishes as being "formulated with kale extract known for its high levels of vitamins A, C and K which stimulate advanced keratin production. Making the nails stronger, brighter and more nourished. The entire Nailkale range also features Nails inc.’s patented Regenerating Complex (a two-fold Aldehyde, Zinc and Calcium blend) that boosts the production of keratin for harder, stronger and healthier nails" (from the Nails Inc. website).

I did a trial run of the NailKale Illuminator and wore it for three days.  It had good staying power (no chips), and I can say that even a week later I don't see any peeling or splits in my nails, but that could also be because I recently filed down my nails, so I can't connect the health of my nails to the use of NailKale specifically.

Personally, I'm interested in trying the NailKale Superfood Base Coat that's supposed to be keratin-enriched and have other healthy stuff in it.  While many people say that adding nutrients to nail polish is useless because your nail plate is dead the way hair is considered dead, I find that any little thing can help keep up the health of nails, so if it works for you, why not try it?


A quick note on the redesigned Nails Inc. bottles:

If you examine the bottles in the above photos, you'll notice that in the first picture the bottles have silver lids, and then in the subsequent photographs, I have taken off the silver lids, which left me with the smaller black handle.  So now Nails Inc. bottles are like many other companies (Chanel, Nars, etc.) where the bulky outside lid removes to reveal a smaller and easier to manage lid/brush.  The brush itself has been redesigned as well.  It now fits with the wider, curved-edge brushes that all the companies seem to be favoring.

Overall, the redesign of the bottles really seems to work.  Each bottle feels like its made out of thick glass, giving it a heavy, weighted feel.  The weighted feel makes it seem higher quality than if the packaging was thin and easily breakable.  The curve of the glass also makes it easier to hold, and more comfortable in the palm of the hand.


What's your opinion/position on nail polish and kale?  Have you tried NailKale yet?

Saturday, July 5, 2014

Making Piet Mondrian Patriotic


Maybe you don't know of Piet Mondrian by name, but the artwork below will likely look familiar.  Mondrian's "Composition II in Red, Blue, and Yellow" is a well loved artwork and has been reproduced as patterns in fabric, handbags, and yes, nail art.


 image from wikiart.org


For this national holiday, I decided replacing the yellow with blue in recreations of Mondrian's most famous works would turn the designs into red, white, and blue compositions perfect for the patriotic feel of the 4th of July.


Nail lacquers used for this design (from left to right as shown above) are Coca-Cola Red by OPI, Regal by Illamasqua, Pacific Blue by Sally Hansen, While On by Sally Hansen, and Raven by Zoya.  You will also need painter's tape, scissors, tweezers, a black permanent marker, and a piece of card stock or scrap paper.


Begin by layering a smooth white polish on your nails.  I chose While On by Sally Hansen, but any white will do.  Finish with a quick drying top coat because you will be using painter's tape on top of the polish and need it to be completely dry in a short time to move on to Step 2.  (I waited a whopping two hours before moving on.  Just to be sure.)


Whip out the Scotch blue painter's tape for Step 2!

Remember that there will be black lines that "box off" each square of color in the final nail art, so for Step 2 the blue painter's tape will work in place of where those black lines will be.

Cut slim strips of blue painter's tape and begin by sectioning off each nail into geometric patterns with different sizes of rectangles that will be filled in with different colors.  Since the goal for this nail art is to make it look like a work by Piet Mondrian while keeping with the patriotic color scheme, each nail should have both red and blue on it.

Regal by Illamasqua dried quicker than the OPI and Sally Hansen colors, so I painted that on last.  Since three different lacquers are being used at one time per each nail, you must work quickly to fill in the squares before the nail polish gets too tacky and attaches to the painter's tape, then coming off when you pull off the painter's tape.

When moving on to Step 3, you can either choose to put a top coat on, or forgo top coat keeping in mind that you cannot add top coat after Step 3 (you'll see why in a minute).


For Step 3, you will still need the painter's tape, but now you will also need the permanent marker, tweezers, and card stock.  Rather than waiting for the nail polish you used in Step 2 to dry completely, you will be cutting the blue painter's tape into strips that are as wide or as narrow as needed to use as the black lines for the Mondrian nail art compositions you are creating.

After cutting a strip of blue painter's tape, place it on the piece of card stock leaving one edge of the tape free so you can easily peel off the tape later.  Color the tape in with your black permanent marker so that the strip of painter's tape is completely covered in black ink.  (While you may want to try painting the painter's tape with black nail polish - and that would work - remember that you will have to place the strips of tape on your nails and if you are waiting for the black nail polish to dry, it may smudge during placement, thus the reason for using a quick-drying permanent ink.)

For each black line you will be adding to your nail by way of the colored painter's tape, match one free edge of the painter's tape to the end/beginning on your nail of where that line will be.  Then you can easily see how long of a piece of painter's tape you will need, and you can cut off any excess colored painter's tape with your scissors.

Use your tweezers to pick up the small strips of painter's tape and place them on your nail.  You can also used the tweezers to push down on the colored strips of painter's tape so that it adheres securely to your nails.

Note: because you are not using black nail polish for the strips, you cannot add top coat after putting the colored strips of tape on your nails without the colored ink from the strips bleeding onto your nails. (Believe me on this - I tried it out just to check.  You'll end up with a gray mess.)


And now you have your final look!  Because we've used black tape instead of black nail polish, this nail art look is only temporary and will start to peel off a few hours later, but the adhesive from the tape does help this look last through dinner and a fireworks show!


So, what do you think of this look?  Have you tried coloring in tape that was not originally meant as nail art tape before?  Would you be willing to try using painter's tape for this purpose, or would you rather just buy nail striping tape?

Hope everyone in the States had a good 4th of July and that those of you that are international readers are enjoying your weekend!  (And don't forget - red, white, and blue are common flag colors - this look could work for many different national holidays across the globe!)

Thursday, May 15, 2014

Nails Inc. Floral Collection Swatches


The Floral collection by Nails Inc. is one of the new Nails Inc. collections that just released this Spring.  There are 4 polishes in this collection that each consist of flower shaped glitter in various color combinations.  At the time of typing this post, these polishes are now available in store and online at Sephora.  If you are not in the United States, the Nails Inc. website has these polishes listed, although it says they are currently unavailable.


base coat, 2 coats My Turn by Sinful Colors, 1 coat Daisy Lane, no top coat

This is Daisy Lane.   An adorable name for an adorable polish!  Featuring white, pink, and red flower glitter with small white glitter, and light pink micro glitter in a clear base.


base coat, 2 coats My Turn by Sinful Colors, 1 coat Daisy Lane, no top coat

Below is Floral Street Mews.  The clear base holds a multitude of glitters.  Besides the white and blue flower shaped glitter particles, there are 5 different sizes of glitter pieces.  There are orange and white micro glitter pieces, followed by slightly larger white and light pink glitter glitter pieces (that I will refer to as "small" glitter pieces).  Next up from the small glitter is the medium sized hexagonal glitter in light pink and white.  Following that in size are larger glitter pieces that are hexagonal in shape that only appear to come in white.  The largest size of hexagonal glitter pieces (that I would consider the "extra large" pieces of glitter in comparison to all the other sizes) come in white and the same blue hue as the flowers.  


 base coat, 2 coats My Turn by Sinful Colors, 1 coat Floral Street Mews, no top coat

Because Floral Street Mews has so many different sizes of glitter and in differing color combinations, this one looks a bit more "exciting" to the eyes, when painted on top of a bland black or white (or gray, as done below), even though all the glitter within this polish is pastel in tone.


 base coat, 2 coats My Turn by Sinful Colors, 1 coat Floral Street Mews, no top coat

Below is the last polish I picked up from this collection: Richmond Gardens.  Upon first inspection, the glitter colors in this polish appear to be a turquoise-blue, a light green, and a white, but that isn't completely correct.


 base coat, 2 coats My Turn by Sinful Colors, 1 coat Richmond Gardens, no top coat

The smallest glitter (the "micro" glitter) is yellow/chartreuse in color (it looks very much like a green-leaning yellow).  The larger sized glitter (which I will again refer to as "small" to differentiate from the other sizes of glitter), is either a turquoise-blue or light pink.  The hexagonal medium sized glitter comes in a plethora of colors, including that same yellow/chartreuse color seen with the micro glitter, light green, turquoise-blue, and light pink.  The medium sized glitter is the largest glitter in this polish besides the flower glitter (which is giant by comparison).  There is, in fact, no white glitter in this polish (the photos make the pink glitter look white).


base coat, 2 coats My Turn by Sinful Colors, 1 coat Richmond Gardens, no top coat


I would consider the glitter in all of these polishes to be matte glitter, even though it almost has a pearlized finish (as seen especially in Daisy Lane with the white glitter particles), but I attribute that to the clear, shiny base that the glitter sits in.

Instructions on how to apply (or how to not have to fish the flower shaped glitter pieces out with an orange stick or tweezers):
1) After you apply your requisite base color (or no color if that may be the case), have a piece of scrap paper near you.
2) When you first open the polish bottle, dip the brush into the center of the opening (without brushing it against the sides of the bottle, taking off excess glitter), and begin brushing the glitter on the brush onto the scrap paper.  It is likely that all of this glitter will be of the micro, small, medium, large, or extra large variety, and will not be a flower.  The flower pieces are heavier and so they tend to sink just a bit in the clear base.
3) Repeat the process in step 2, continuing to dip the brush into the center of the opening, working to not scrape off the excess glitter that would just cling to your brush the next time you put it back into the bottle.
4) After repeating step 2 (and 3) a few times, you should eventually get a flower glitter piece to appear. Warning: once you have had one flower-shaped glitter piece cling to your brush, your are likely to have a bunch of flowers cling to the brush at the same time.  This is when you can dab those flowers from the brush on multiple fingernails, without having to reinsert the brush into the bottle to get more flowers.
5) If you have come to the part where each time you pull out the brush you get multiple flowers, now you just have to work at getting the right amount of other glitter pieces you want on to your nails!

And there you have it!

If you think the flower shaped glitter looks familiar, you may be thinking of the newly released Formula X for Sephora Cherry Blossom Top Coat.  I am almost certain that the flower glitter in the Cherry Blossom Top Coat is the same shape as the flower glitter in these Nails Inc. polishes.  The only differences I see between the two are the price (the Nails Inc. are $11US and the Formula X is $12.50US), and the color variations that are available in the Nails Inc. polishes (that are not available in the Formula X, which is only pink in color).

So, what do you think of these polishes?

Tuesday, March 18, 2014

Nails Inc Garden Party Swatches


New for Spring 2014 in Sephora stores: the Nails Inc. Garden Party Special Effects Collection!  I was so excited when I found an empty display spot for these three polishes at my local Sephora.  Unfortunately, they were not currently available online, so I had to be patient and wait for them to show up.  Luckily when they did show up on the Sephora website I was able to see they were at the Sephora inside JCPenny store nearest me.  On that note, I have found that this pattern is often true for new Nails Inc. products.  They are first available at the Sephora inside JCPenny stores before the standalone Sephora stores (and sometimes even before being available online), so check there first when looking!


 base coat, 2 coats Sinful Colors My Turn, 1 coat Westbourne Gardens, no top coat

This collection consists of three multi-hued and multi-sized glitter toppers all in a clear base.  The first I have to share is Westbourne Gardens.  This polish is mostly pink, featuring small hexagonal glitter in metallic pink, matte pink, and matte white colors.  Smaller white matte hexes are strewn throughout, along with micro matte pink hexagonal glitter.  All of the pink glitter with the white glitter thrown in creates an overall soft pink hue making this glitter polish beautiful for any spring event!


  base coat, 2 coats Sinful Colors My Turn, 1 coat Westbourne Gardens, no top coat

Next up we'll look at Portobello Gardens.  This mostly blue glitter topper features small hexagonal glitter in a cobalt metallic blue, a matte turquoise-blue, and a matte white interspersed with smaller matte white and matte light green hexagonal glitter.  Filling up the rest of the clear base is micro turquoise-blue hexagonal-shaped glitter.


  base coat, 2 coats Sinful Colors My Turn, 1 coat Portobello Gardens, no top coat

The white glitter mixed in with the bright blue glitters along with a touch of green make this the perfect winter-to-spring shade!


 base coat, 2 coats Sinful Colors My Turn, 1 coat Portobello Gardens, no top coat

The last lacquer in this collection is Princes Gardens (which I either always want to add an apostrophe to or call "Princess Gardens").


 base coat, 2 coats Sinful Colors My Turn, 1 coat Princes Gardens, no top coat

This glitter is the most multi-hued of the three, featuring small metallic lilac/lavender, matte light blue, and matte light green hexagonal glitter.  There is smaller matte white hexagonal glitter throughout, along with micro light green hexagonal glitter.


base coat, 2 coats Sinful Colors My Turn, 1 coat Princes Gardens, no top coat

All three of these glitter polishes are now available on the Sephora website or in stores if you are in the United States.  Retail price is $11US each.  If you live in another country, have you seen this collection?

If you think you've heard of the Garden Party collection before, you have.  About a year ago there was a four polish collection available on QVC's UK website that contained only one glitter polish called Grosvenor Gardens.  These two collections don't seem to be connected except by name.

What do you think of this collection?  If you want to see photos of what the display looks like so you can keep an eye out for it at your local Sephora, check out my pictures on Twitter or Instagram!